Homemade Granola

Homemade GranolaThis year for my birthday it became really clear how much my friends know and love me. Almost all of my gifts were either cookbooks or some food related item. One of my favorite recipes out of my birthday stash is for homemade granola. It comes out of the book “Homemade Pantry; 101 Foods You Can Stop Buying & Start Making” by Alana Chernila. It is such an awesome cookbook and has inspired me to make more of our pantry staples like bread and granola. If you buy the supplies for this recipe in bulk you actually end up saving a lot of money… especially if your husband considers granola one of the 5 main food groups and eats it at least twice a day.

Homemade Granola (inspired by Alana Chernila’s Granola in “Homemade Pantry”)

Homemade Granola

Ingredients

  • 5 cups old fashioned rolled oats
  • 6 TBS sesame seeds
  • 1/4 cup sunflower seeds
  • 1 cup sliced almonds
  • 1/4 tsp kosher salt
  • 2 tsp ground cinnamon
  • 6 TBS oil (I use vegetable, but canola works fine too)
  • 1/2 cup maple syrup (or 1/4 cup maple syrup + 1/4 cup honey)
  • 1 TBS vanilla extract
  • 3/4 tsp almond extract

Directions

  1. Preheat oven to 250 F.
  2. Combine oats, sesame seeds, sunflower seeds, almonds, salt and cinnamon in a large mixing bowl.
  3. Then whisk together oil, syrup (and honey if using), vanilla and almond extract.
  4. Pour liquid mixture into oat mixture a little bit at a time, stirring between additions to make sure that the oats and seeds are evenly coated in liquid.
  5. Grease a jelly roll pan (or use parchment paper), and spread out granola evenly on surface.
  6. Bake for 90 minutes, stirring the granola around the pan every 30 minutes. (rotate pan if cooking unevenly)
  7. Turn off oven and let sit for at least 45 minutes and up to 6 hours so that the granola gets crispy inside your cooling oven.
  8. Store in an airtight container for up to 3 weeks!

On Crying to Verizon Wireless’s Customer Service (AKA Coping with Whole Wheat French Bread)

Whole Wheat French Bread

Last Wednesday was the kind of day where I purposefully watched depressing videos all morning and then decided to indulge in the depression by calling Verizon Wireless’s Customer Service. Here’s why: When I checked our bill for the month I had been shocked at it’s price: $273. Yes two hundred and seventy three dollars for two non-smart phones for ONE MONTH OF SERVICE. I was outraged (am still outraged). I called to find out why this had happened. Now follow me the best you can on this: around the 15th of last month I needed to change plans (per Verizon’s suggestion) in order to not go over our 700 minute limit (we were at 620ish). So we switched to a new plan that allowed unlimited minutes. Now the kicker is that at the 15th of the month, unbeknownst to us, we had only been allotted 400 minutes (it says this NOWHERE in the contract). Therefore, we were charged for over 200 extra minutes resulting in a bill of $273. The poor woman who explained all of this to me then had to listen to me start crying. Then start yelling. It was bad. Really bad. I told her that I wouldn’t be able to afford groceries because of Verizon (a bit of an exaggeration, but still kind of true). Eventually we hung up, and to be fair she did refund me $20 on my bill. I decided I would call back and demand to talk to someone higher up.

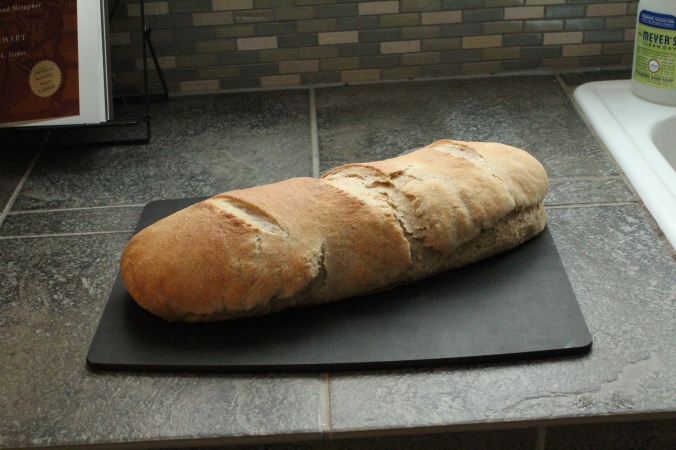
Out of the fog of anger I decided to make Wheat French Bread during my phone call expedition. I thought the kneading and the punching of the dough would help calm me down, plus when you know you’re going to be on the phone for hours what better to do than make bread? Sure enough, the irreplaceable smell of flour and yeast mixing and rising that filled my house calmed my anger.

When I called back I asked to speak to one manager after another and was eventually refunded another $40 after 3 hours on the phone. I do want to be clear about one thing; I have nothing against the customer service representatives at Verizon. They were all extremely helpful and kind and really did all they could to help. It’s the policy that I’m angry at and will continue to fight. Though I’m still unsatisfied and will be continuing to fight Verizon on this in the upcoming week, I did get an amazing loaf of French Bread out of the ordeal. Plus, if they still won’t budge and worse comes to worse… we can always live off of bread for the next few weeks.

This was my first time making French Bread and it turned out really well because the recipe was fairly simple and easy to follow. If you haven’t made bread before… do it! It IS time consuming, but the smells and the tastes you get out of it are totally worth it.

Whole Wheat French Bread

Whole Wheat French Bread

Whole Wheat French Bread

From Brother Juniper’s Bread Book by Peter Reinhart

Makes 1 loaf

Time: 4 hours and 45 minutes (or the approximate length of one customer service call to Verizon Wireless)

Ingredients

  • 1 tsp active dry yeast (or 3/4 tsp instant yeast)
  • 2 TBS+ 1 3/4 cups lukewarm water (more as needed)
  • 3 cups unbleached flour
  • 1 1/2 cups whole wheat flour
  • 1/2 TBS + 1/2 tsp salt
  • Oil for coating the bowl
  • Cornmeal for sprinkling on the pan
  • A spray bottle with cold water

Directions

  1. Pour 2 TBS lukewarm water into small bowl and sprinkle with active dry yeast. Let sit for 3 minutes or until frothy (skip this step if you are using instant yeast)
  2. Mix flours and salt together in medium sized bowl. Add 1 3/4 cups water and yeast.
  3. Stir until the dough is able to form into a ball adding more water if necessary
  4. Turn dough onto lightly floured surface and knead for 10-12 minutes or until is it only slightly sticky (doesn’t stick to fingers) and very elastic
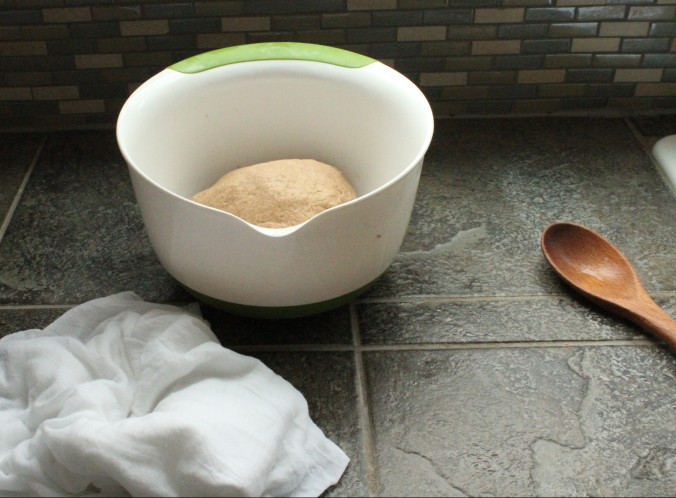
  5. Return to oiled bowl and let sit in a warm area covered with a damp towel or plastic wrap for 1 1/2 hours to rise
  6. Once it has doubled in size, punch down, form into ball and cover to let rise again for another 1-1 1/2 hours (the punching it down helps form a crusty crust)
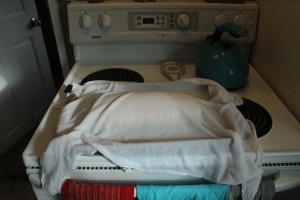
  7. To form your loaf roll out the dough into a long rectangle (picture a dish towel)
  8. Fold it in thirds (like you’d fold a towel). Turn so that the seam is on the bottom.  and roll out again (you are trying to create a firm surface that will let the bread rise without spreading horizontally). Fold it into thirds a second time and press to close the seam making sure seam is on bottom again.
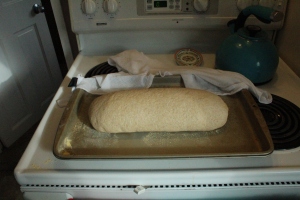
  9. Sprinkle a baking pan or pizza stone with cornmeal. Lay dough onto it. Cover and let rise for 1 hour.
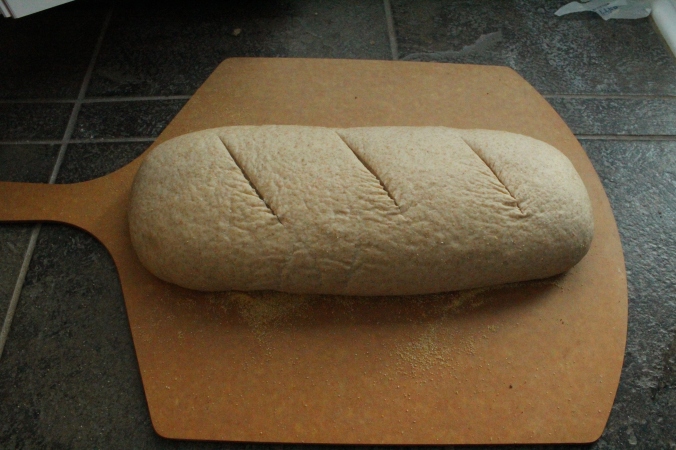
  10. When you are almost ready to bake preheat oven to 450 F. Then cut three diagonal lines into your loaf with a serrated knife.
  11. Spray loaf generously with cold water and place into oven (the water helps the crust get crunchy)
  12. In 2 minutes, spray again
  13. Repeat the spraying 2 more times and then bake for about 10 minutes.
  14. Once it is golden, turn off oven and let sit in cooling oven for 10 more minutes
  15. Let cool and then serve!

Whole Wheat French Bread

Whole Wheat French Bread

Chickpea Salad with Tomatoes, Avocado, Blue Cheese and Balsamic Vinegar

Chickpea Salad

At a typical dinnertime Lander and I have salad, and more than once he has looked over and seen me dumping chickpeas onto mine resulting in a running joke that goes something like: “Do you want any salad with those chickpeas?” In an act of defiant sarcasm I set out a few months ago to make a salad that was literally made (almost) entirely of chickpeas and it actually turned out to be a favorite in the Hultin House. It’s now my go-to work day dream lunch since it is super easy, simple and filling.

Chickpea Salad

Serves 2

Time: 10 minutes

Ingredients

  • 1 can of chickpeas
  • 1 medium tomato (diced)
  • 1 avocado (diced)
  • 1/3 cup blue cheese crumbles  (more or less depending on personal preference)
  • 1 TBS balsamic vinegar ( (more or less depending on personal preference)

Directions

  1. Combine all ingredients
  2. Stir, serve and enjoy!

Spatula/Spatular and Memé’s Blueberry Tea Cake


Memé's Blueberry Tea Cake

If you ever meet my mother you’ll immediately pick up on our family’s geography: the East Coast. She is a Massachusetts and New York native and has spent enough time in both places to develop a distinct accent. Along with that come, what her nine children lovingly refer to as, “Mom phrases” that include, but are not limited to:

Bawthroom (bathroom)

Boopah (butt)

Squatties (short drinking glasses)

Spatular (spatula)

In the Maddocks family a person must learn to master the dance between “common/normal person language” and “Maddocks language.” Just ask my husband… it’s a dance I’m still learning. To explain the depth of this predicament, here is a story: my sister spent her entire elementary school career convinced that her teacher’s were not spelling “spatula” correctly for it should clearly be spelled “spatular” if you write it like you say it. Later in her youth, she came to find out it was indeed our FAMILY that was saying it wrong; a shocking revelation.

Recipe

Now, we always blame my mother for these sorts of moments that come frequently in a family like ours, but a few months ago I came to a shocking revelation of my own. Here’s the story: One day I set out to make my beloved grandmother’s (Memé’s) famous “Blueberry Tea Cake.” Memé is the person who taught me how to paint and instilled the love of art and food in me at a very young age. She passed away a few years ago, but whenever I make this cake, I feel like she is standing in the kitchen with me. So while reading her recipe I saw it for the first time… right there, clear as day she had written “spatular.” And so I learned it is not singularly my mother to blame for our language barrier, but in fact my grandmother and most likely her mother and grandmother as well. So… here’s to Memé’s famous Blueberry Tea Cake and generations of misspelled, mispronounced words. May I continue the tradition with a family of my own.

spatular

Memé's Blueberry Tea Cake

Serves: 4-5

Time: 45 minutes

Ingredients

  • 2 TBS butter (at room temperature)
  • 1 cup sugar
  • 2 eggs (separated, whites stiffly beaten)
  • 1 1/2 cups flour
  • 1/3 cup milk
  • 1-2 cups blueberries
  • powdered sugar for sprinkling

Directions

  1. Cream butter and sugar together (make sure your butter is at actual room temperature. I tried to rush this and it ended with an undercooked batter filled mess and a lumpy cake that you see in the photo after which it was saved by some more cook time. By the way, it still tasted amazing)
  2. Add egg yolks, beat well
  3. Add flour alternately with milk (you’ll feel like there is not enough milk, but trust me, there is)
  4. Gently fold in stiffly beaten egg whites
  5. Pour HALF of batter into greased 9″x9″ (I’ve used my 6″x6″ and it turns out fine)
  6. Spread it with a spatular, cover with blueberries
  7. Add remaining batter spreading lightly so every blueberry is covered
  8. Bake until VERY lightly browned for about 35 minutes
  9. Sprinkle with powdered sugar while hot (using a sifter)

Love,

Memé

Memé's Blueberry Tea Cake

Beans and Rice (a confession)

IMG_5158

Ok. I have a confession: I like Mexican food. Now hold on… that is not bad in and of itself. What makes this bad is that for about 20 years I avoided Mexican food at ALL costs. The reason? Mexican food was my older brother Dave’s absolute favorite food, and as a principle if Dave liked something then I could not and would not like it. So when the family deliberated over which restaurant to go to Dave would always choose Pueblo Viejo and I would beg for, well, ANYTHING but Pueblo Viejo. The worst part of it all is that it was when I started dating this guy named Lander (my husband) I quickly found out that he loved Mexican food, and so of course when we would frequent his favorite restaurants (all Mexican) I had no qualms about it and soon found out that: I like Mexican food.

Now that Lander and I are married and share most every meal we have declared our official family-favorite/always-have-on-hand/cheap-and-easy meal is something so simple and yet so unfailingly delicious; beans and rice. This is our go-to when our bank account is shockingly low (this happens roughly twice a month), and it’s a great meal because you can add chicken to it, but if you are trying to save money it’s just as good without it. Yes most of it comes from a can (another thing that I have no qualm about), but trust me; it’s delicious. And of course… I add chick peas (another optional ingredient… in case you’re not as obsessed with them as I am).

Feeds: 4-5

Time: 30 minutes

Ingredients

  • 2-3 chicken breasts
  • 2 + 1/2 TBS olive oil
  • 1 can of Las Palmas green chili (whatever heat you like: they have from mild to hot)
  • 1 cup of uncooked rice
  • 1 small red onion (diced)
  • 1 can of chick peas (15 oz)
  • 1 can of black beans (20 oz)
  • 2 large tomatoes (diced)
  • 1/4 cup fresh cilantro (chopped)
  • shredded cheddar cheese

Directions

  1. Cook the rice according to package directions
  2. Pour green chili into small sauce pan and heat over medium heat, stirring occasionally
  3. In a large skillet heat up 2 TBS of olive oil over medium heat and add chicken to pan. Cook until no longer pink in middle and light brown on outside turning every 5 minutes or so.
  4. In a medium sauce pan heat remaining 1/2 TBS olive oil over medium high heat. Add onions and cook until fragrant but not too soft
  5. Add chick peas, black beans and tomato to onion and cook for about 5 minutes on medium heat
  6. Add the cilantro to the bean mixture
  7. My suggestion would be to serve in this order in the bowl: rice, chicken, cheese, bean mixture, more cheese, green chili. But you are an adult and can change that if you want. Basically it all needs to end up in one bowl of cheesy, saucy deliciousness.

Beans n Rice

Eggs Benedict; A Love Story

Ingredients for Eggs Benedict with Arugula, Avocado, Tomato and Balsamic GlazeEggs Benedicts and I have a long history. When I discover a food or meal I love, I become a little bit obsessed. This happened with Eggs Benedict a few years ago around the time my band (now a disbanded band) went on tour where we slept on floors and ate at any divey restaurant we came across. So when I tried tirelessly to order Eggs Benedict at every restaurant we ate at, I, first of all, never succeeded, and, second of all, was made fun of by my band mates (5 boys) endlessly for my fancy-pants taste in food. Through thick and thin I stuck in there though, and returned home from tour determined to learn how to make Eggs Benedict so I never had to order it again… and I’m still in love.

This is a twist on the traditional Eggs Benedict in that is has loads more vegetables and a balsamic glaze to balance the richness. My Hollandaise recipe was given to me by my sister and is simple in that you microwave the sauce instead of doing it on a stove and is (pretty much) fool proof because even if you mess it up you just have to whisk in hot milk and it turns into creamy perfection. It’s based on a dish served at Snooze in Fort Collins, CO and it hits the spot every time.

Eggs Benedict with Arugula, Avocado, Tomato and Balsamic Glaze

Serves 4
Time: 45 minutes
Balsamic Glaze 

  • 1/2 cup balsamic vinegar
  • 3 TBS brown sugar

Hollandaise Sauce

  • egg yolks
  • 1 TBS lemon juice (plus more if needed)
  • 1/2 cup (1 stick) butter (melted)
  • 1/2 cup milk (if needed)
The Benedicts

  • slices French bread (thinly sliced)
  • 1 1/2 cups arugula
  • avocado (sliced)
  • large tomato (sliced)

Directions

Begin with the Balsamic Glaze

  1. Combine balsamic vinegar and brown sugar in small saucepan
  2. Bring to a boil on medium high heat stirring constantly (try not to inhale too deeply around the boiling mixture… it will burn your nose!!)
  3. Turn heat down and simmer uncovered for 25 minutes stirring occasionally. Take off heat and refrigerate until meal is ready to be served.

Now for the Hollandaise Sauce 

  1. Combine egg yolks, lemon juice, salt in a small bowl
  2. Add egg yolk mixture to melted butter and whisk vigorously
  3. Microwave egg/butter mixture in 15 second intervals stirring well after each 15 seconds. Do this about 4 times or until your sauce thickens (you will know when it has thickened)
  4. Here’s where it is up to you: taste your sauce and if you are happy with the flavor and consistency leave it be and keep it in the microwave to keep warm. IF you want a creamier less rich sauce, need to reheat the sauce OR if it has curdled (uh oh) then follow next steps. Also you may add more lemon at any time according to taste
  5. In a small saucepan bring milk to a rolling boil on medium high heat
  6. Once it has reached a boil quickly remove from heat and add to sauce a tablespoon at a time whisking as vigorously as you can with each addition. You should see the sauce become “uncurdled” and develop into a beautiful creamy hollandaise sauce. If this is not the case heat and stir in more milk until it is. The effectiveness of this method depends on two things: how vigorously you whisk the sauce after the addition of the milk and the temperature of the milk. If it isn’t working try adjusting one of those things (I commonly don’t whisk quickly enough)

Now assemble your Benedicts 

  1. Drizzle olive oil onto bread slices and generously salt and pepper. Put in oven until golden brown (about 10 minutes)
  2. Then layer arugula, tomato slices, and avocado onto bread… now it is time to poach your eggs!
  3. Bring a saucepan filled about 2 inches with water to a boil over high heat. Add vinegar to water (this will help your eggs keep their shape)
  4. Meanwhile, crack eggs into separate small bowls
  5. Gently drop eggs one at a time into boiling water using a slotted spoon to help guide it into keeping its shape. While they are boiling the excess egg whites will start to foam. Use your slotted spoon to scoop it and dispose of it into one of your small bowls you used for your eggs.
  6. Let the eggs boil for about a minute or until the whites have hardened but the yolk remains soft. When the eggs are done remove the pan from the heat and gently scoop them out one at a time onto the prepared bread.
  7. Now top with Hollandaise sauce and balsamic glaze and ENJOY!

Eggs Benedict with Arugula, Avocado, Tomato and Balsamic Glaze

Ginger Milk (for the overly acidic tummy)

ginger milk ingredients

I drink a lot of coffee, and my stomach hates me for it. Do I stop drinking coffee? No (and, yes I know I should). So one day when I was at a local coffee shop and had major acid stomach from too much coffee I opted for their ginger milk over caffeine and the results were miraculous… the milk settles the acidic content of the stomach while the ginger does it’s trick of calming it, and so you have a “magical stomach cure-all.” I found a way of making the drink myself; try it out!

Ingredients

  • cups water
  • a 5 inch piece of ginger (peeled and sliced)
  • 1 TBS sugar
  • cup milk

Directions

  1. In a small sauce pan, bring water to a boil over high heat
  2. Add 1/2 TBS of sugar and stir until dissolved in water
  3. Add sliced ginger to water mixture
  4. Add the rest of the sugar and turn heat down to medium and simmer for 25-30 minutes or until liquid reduces by just over half.
  5. Pour mixture through strainer into a bowl or cup. Dispose of ginger slices or save to use in another dish.
  6. Add milk to ginger syrup
  7. Drink up!

Ginger Milk

Marinated Chicken with Potatoes and Chickpeas

ingredients

One thing you should know about me is that I love chickpeas. No really, it’s serious. I go through about a can of chickpeas every other day (sometimes eating them straight out of the can, sometimes being a grown up and putting them in a salad), and I’ve been this way since childhood. Because of this I’ll add chickpeas to just about any meal. So when I find one where chickpeas are actually called for I have to make it. That’s how I came across this recipe, and it has become one of our all time favorites. It’s super easy and awesome for when you’re having people over for dinner because you make it the day before and then just pop it in the oven about an hour and a half before you want to eat.

Recipe inspired by “Extraordinary Marinated and Roasted Chicken, Potatoes, and Chickpeas” on by divasparkle on Food52’s website: https://food52.com/recipes/25866-extraordinary-marinated-and-roasted-chicken-potatoes-and-chickpeas

Time: 20 minutes (prep), 1 1/2 hours (cooking in oven)

Serves: 4-5

Ingredients

  • 1 can of chickpeas (rinsed and drained)
  • 1 3/4 lb of potatoes (peeled and cut into 1 inch pieces)
  • 1 medium head of garlic (cloves separated)
  • 8 bone in, skin on chicken drumsticks or thighs

for the marinade

  • 1 TBS olive oil
  • 2-3 medium lemons
  • 2 TBS brown sugar
  • 2 1/2 TBS mayonnaise
  • 1 1/2 TBS buttermilk
  • 1/2 tsp red pepper flakes
  • 1 TBS tomato paste
  • 1 TBS soy sauce

for serving

  • greek yogurt

Directions

  1. The day before the meal salt and pepper your chicken
  2. Combine the chickpeas, potatoes, garlic and chicken in a freezer bag
  3. Make the marinade by whisking all “marinade ingredients” together. Taste it and adjust seasonings to your liking
  4. Pour marinade into bag and shake to incorporate
  5. Squeeze ALL of the air out of the bag and then place in a bowl and put in refrigerator overnight
  6. Turn bag over about 5 times throughout the day or night
  7. The next day preheat your oven to 375°F
  8. Put the ingredients into an oven safe dish and spread evenly. Salt and pepper
  9. Cook covered for 1 hour
  10. Turn heat up to 425°F and uncover, cooking for an additional 20-30 minutes or until the chicken skin is crisp and the sauce is thoroughly bubbling
  11. Serve with greek yogurt on the side
  12. Enjoy!

Marinated Chicken with Chickpeas and Potatoes

Sweet Potato Gnocchi with Rosemary Brown Butter Sauce with Feta and Balsamic Glaze

IMG_4961

I have been wanting to make gnocchi for a long time, and since I got a potato ricer for Christmas I decided last night that it was finally time to try my hand at it. My maiden voyage went well, but since it was so time intensive I think that next time I’ll double the gnocchi and freeze half to use down the road. In the recipe I’ve doubled the gnocchi so that you can do the same. To freeze gnocchi place them in a single layer on a baking sheet and freeze. Then place in airtight container where they can remain in the freezer for up to a month.

This recipe is inspired by Aida Mollenkamp’s recipe found here

Feeds 3-4

Time: 1 hour 15 minutes

Ingredients

for the gnocchi (**note: this is DOUBLE what you need for this recipe, you can freeze half as explained above or cut this in half)

  • 1 1/2 lb sweet potatoes (halved lengthwise)
  • 1/2 lb russet potatoes (halved lengthwise)
  • 1 TBS olive oil
  • 2 tsp Kosher salt
  • 1/4 c finely grated parmesan cheese
  • 1 large egg (lightly beaten)
  • 3 TBS honey
  • 1 1/2-3 c flour
  • feta cheese for serving

for the balsamic glaze

  • 1/2 c balsamic vinegar
  • 2 TBS brown sugar

for the sauce

  • 4 TBS unsalted butter
  • 2 fresh rosemary sprigs
  • 1 tsp marjoram
  • 2 medium shallots (quartered and sliced)
  • 2 TBS balsamic vinegar

Directions

  1. Preheat an oven to 425 F
  2. Rub olive oil and salt onto potatoes and place face down on a baking sheet. Cook until fork tender (about 30 minutes)
  3. Meanwhile begin the balsamic glaze by combining balsamic vinegar and brown sugar. Bring to a boil on medium high heat stirring constantly (try not to inhale too deeply around the boiling mixture… it will burn your nose!!) Turn heat down and simmer uncovered for 25 minutes stirring occasionally. Take off heat and refrigerate until meal is ready to be served.
  4. When potatoes are fork tender scoop out flesh and pass through a potato ricer (or mash with a fork if you don’t have one) into a medium mixing bowl.
  5. Add salt, parmesan, egg and honey to potato mixture. Stir to combine.
  6. Stir in flour 1/2 cup at a time until soft dough forms. The dough is the right consistency when it is slightly sticky but doesn’t stick to your finger when touched. (It’s ok if you need to add more flour than listed in the recipe to achieve this!)
  7. Begin bringing a salted pot of water to boil
  8. Turn dough onto floured surface. Working with about a golf ball sized amount at a time form dough into a rope that is about 3/4 inch in diameter (don’t be afraid to use flour to help it from sticking to your hands). Then slice into 1/2 inch pieces.
  9. Add gnocchi to the boiling water and cook for 5 minutes. Reserve 1 1/2 cups of cooking water (**hint: use a pasta strainer to scoop out gnocchi when they are done)
  10. In a large frying pan melt the butter and add rosemary and marjoram. Cook until rosemary becomes crisp and you can smell it. Remove rosemary from pan.
  11. Add shallot to frying pan and cook until butter browns and shallots are crispy
  12. Take pan off heat and add balsamic vinegar. This is going to really sizzle on you, just swirl pan around to incorporate vinegar.
  13. Add reserved cooking water to sauce. Use your judgment on how much; it can be between 2/3 cup and 1 1/2 cups. The less you use the richer the sauce will be.
  14. Add gnocchi to sauce and return to medium heat for about 3 minutes or until the gnocchi is completely glazed in the sauce (you can continue to add cooking water in this step if you decide your sauce needs to be a bit saucier, just cook for a bit longer)
  15. To serve: top gnocchi with balsamic glaze and feta cheese.
  16. Enjoy! 

IMG_4965IMG_4968

IMG_4974

Pasta with Snap Peas, Prosciutto and Cream

IMG_4943

This is an adaptation of “Pasta with Prosciutto, Snap Peas, Mint and Cream” by Lechef in the Food52 Cookbook. I become weak in the knees when I see a recipe for creamy pasta though I’ll be the first to admit that any cream sauce usually ends up feeling too rich by the last bite. It’s the snap peas that make this dish a success. They add a crunch that balances the cream in a really unique way and when combined with flavorful prosciutto and lots of garlic you just can’t go wrong.

Ingredients

  • 3 TBS olive oil
  • 4 garlic cloves, minced
  • 1/4 lb prosciutto, finely diced
  • 4 small shallots
  • 3/4 lb pasta (orrechiette, campanelle or farfalle)
  • 1/2 lb fresh snap peas, chopped
  • 2 c heavy cream
  • 3/4 c parmesan cheese

Direction

  1. Put prosciutto in freezer about a half hour before cooking (this will make it easier to dice)
  2. Begin bringing a salted pot of water to a boil
  3. Heat olive oil over medium heat and add garlic cooking until fragrant (about 2 minutes)
  4. Add prosciutto and cook for 3 more minutes
  5. Add shallots and cook until soft (3 minutes) then season with salt and pepper. Turn to low heat
  6.  Add pasta to water and cook according to package directions
  7. When pasta is almost done turn heat back to medium on the shallot, prosciutto mixture and add snap peas cooking for 2 minutes (DO NOT OVERCOOK SNAP PEAS)
  8. Add cream to mixture and bring to rapid boil stirring constantly
  9. Add parmesan cheese and stir to combine
  10. Drain pasta and pour sauce over it
  11. Enjoy!

IMG_4948